


XLIFF Editor User's Guide
Overview
The G11NToolKit XLIFF Editor allows the L10N engineer to modify the XLIFF file created by the tokenizers. This allows the engineer to manipulate the translation flag and add notes to the translator. The current version has minimum function which enables the engineer to edit only the Translate and Approved flags. Additional features will be added in later versions.
Return to: Top of page
Start the XLIFF Editor
To start the XLIFF editor, make sure the G11NToolKit executables directory is defined on your path. To do this in Windows use the Properties page of the My Computer ICON to set the PATH environment variable to include the G11NTOOLKIT_DIR\bin directory (replace G11NTOOLKIT_DIR with the actual value of that environment variable). Once the path is set simply use the following command on the command line to start the editor:
xlfEditor
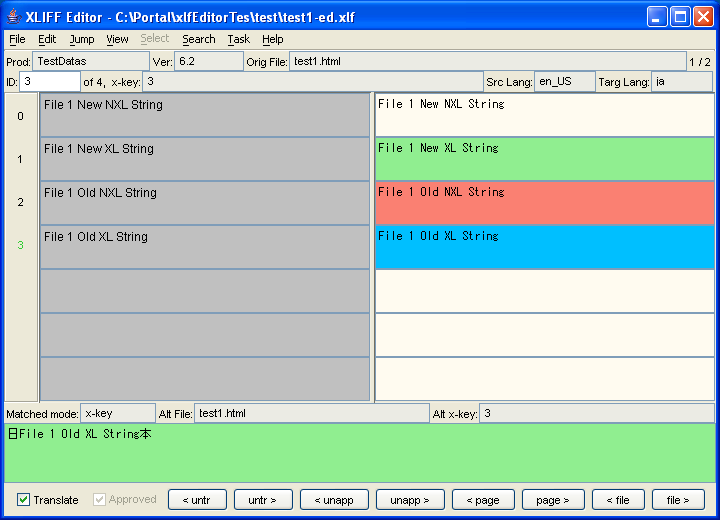
The following screen will appear:

Return to: Top of page
Process
There are two phases in the process: the pre-process phase and the post-process phase. These come before the files are translated and after the translated files are returned from the translator.
The pre-process phase is to get the files ready for translation. This includes merging several individual extracted string files from the G11NToolKit tokenizers into a single XLIFF file, setting the translate flag to no for any string that is known to be non-translatable, setting the translate flag to yes for any string that needs translation, and preparing the file for use in a translation tool. The XLIFF Editor will make sure this is done once by maintaining a history of the translate flag settings for the strings and applying this history to the file as needed. The steps in this phase are (see below for further details on each step):
- Open the XLIFF File
- Apply the Previous XLIFF File, if it exists
- Edit the Translate Flag to change it to either yes or no
- Split the File into an XL XLIFF file and an NXL XLIFF file
- Prepare the Xliff File for Translation
The post-process phase is to get the files ready for the G11NToolKit detokenizers. This includes merging the XL XLIFF file returned from the translator with the NXL XLIFF file then making the individual extracted string files. The steps in this phase are (see below for further details on each step):
- Merge NXL XLIFF File into translated XL XLIFF file
- Export to each of the extracted string XLIFF files
Return to: Top of page
Open the XLIFF File
Here you can either open an existing XLIFF file or grab several files and merge them into a single XLIFF file.
Open a File
To open an XLIFF file, select the Open item from the File menu then select the XLIFF file to open. For example, if the XLIFF file you want to open currently resides in the project\workdir directory and is named test.xml then you would select the Open item from the File menu then select the project\workdir\test.xml file in the Open File dialog window. You may have to navigate in the Open File dialog window to find the file.
Return to: Top of page XLIFF Editor Process
Grab Files
To grab a set of XLIFF files, select the Grab single XLIFF files item on the File menu and select the directory that contains the files to grab. For example, if the files you want to grab reside in the project\workdir directory then you would select the Grab single XLIFF files item on the File menu to open the Open File dialog window then select the project\workdir directory. You may have to navigate in the Open File dialog window to find the directory.
Return to: Top of page XLIFF Editor Process
Apply the Previous XLIFF File
Applying a previous XLIFF file helps you take advantage of work done previously. The XLIFF Editor can use old XLIFF files to remember what was done before so you don't have to re-do all the work again. Primarily, once you have gone to effort of setting the Translate flags to show the extracted strings that should not be translated you want to remember it. These strings will generally not be translated in any language or for any iteration of the project. This is the same as using a Translation Memory to remember the translations from past work. To apply a previous XLIFF File, select the Apply old XLIFF item from Task menu then select the XLIFF file to apply. For example, if the work from the previous project iteration is stored in the project-1\workdir and the XLIFF file containing all the translation work is stored in the test.xml file, you would select the Apply old XLIFF item from Task menu then select the project-1\workdir\test.xml file in the Open File dialog window. You may have to navigate in the Open File dialog window to find the correct file.
Return to: Top of page XLIFF Editor Process
Edit the Translate Flag
Flags
- Translate
- If you want to tranlate the current Translation Unit, set the Translate flag to ON. If not, set it to OFF. Usually, if current Translation Unit is matched with a Translation Unit in a previous XLIFF file, the Translate flag is set the same as it was in the previous XLIFF file during the Apply old XLIFF process. You can change it as needed.
- Approved
- Usually, if current Translation Unit is matched with a Translation Unit in a previous XLIFF file, the Approved flag is set to ON during the Apply old XLIFF process. If current Translation Unit is new, the Approved flag is set to OFF.
Return to: Top of page XLIFF Editor Process
Command Buttons
- <untr
- Move to previous Translation Unit where the Translate flag is OFF
- untr>
- Move to next Translation Unit where the Translate flag is OFF
- <unapp
- Move to previous Translation Unit where the Approved flag is OFF
- unapp>
- Move to next Translation Unit where the Approved flag is OFF
- <page
- Move to the previous page
- page>
- Move to the next page
- <file
- Move to the previous original file
- file>
- Move to the next original file
Return to: Top of page XLIFF Editor Process
Keybindings On the Translation Unit Panel
- Space
- Toggle Translation
- Enter
- Toggle Translation and move to next line
- Cursor Up
- Move cursor up
- Cursor Down
- Move cursor down
- Page Up
- Move page up
- Page Down
- Move page down
- F1
- Next TU with attribute value
- F2
- Previous TU with attribute value
- Home
- Move cursor to top TU segment of current file
- End
- Move cursor to end TU segment of current file
- CTRL+F
- Open find dialog
- F3
- Find next
- Shift+F3
- Find previous
- CTRL+R
- Open replace dialog
- CTRL+F3
- Replace next
Return to: Top of page XLIFF Editor Process
Search/Replace Dialog Window
To open the Search/Replace dialog window, select the Search item or the Replace item from the Search menu. The Search Key is automatically set up if a string is selected before openning the Search/Replace dialog window.

Return to: Top of page
Colors Used On the Translation Units
On the Target strings:
- none
- New Translation Unit with the Translate flag set to OFF.
- Green
- New Translation Unit the Translate flag set to ON.
- Red
- Old Translation Unit with the Translate flag set to OFF by the Apply old XLIFF process.
- Blue
- Old Translation Unit with the Translate flag set to ON by the Apply old XLIFF process.
On the Alt strings:
- Green
- 100% string and x-key match.
- Yellow
- 100% string match with column mode x-key match.
- Pink
- 100% string match with file mode x-key match.
- Red
- 100% string match with string mode x-key match.
Split the File
To split Translation Units into an XLIFF file containing only the translatable strings and an XLIFF file containing only the non-translatable strings, select the Split XL/NXL item from the Task menu then select a prefix string for the new XLIFF file. (The full file name will be generated automatically and look something like this: xxxx-XL.xml)
Return to: Top of page XLIFF Editor Process
Prepare the XLIFF File for Translation
Import only the XLIFF file that contains the translatable strings into a translation tool. Do not import the XLIFF file that contains the non-translatable strings. In this way you will prevent inadvertent translation of strings that you have decided should not be translated.
Return to: Top of page XLIFF Editor Process
Merge NXL XLIFF File
First open the translated XLIFF file using the Open item from the File menu. Then select the Merge NXL into XL item from Task menu. Next select XLIFF file that contains the do not translate strings that matches the translated file. Remember these files were created from a single file so you want to get back to the same file but with the translations added to it.
Return to: Top of page XLIFF Editor Process
Export
In order to complete the translation process you will need the individual extracted string files back again with the translations added to them. These files are used by the G11NToolKit detokenizers to make the target files. To create the individual extracted string XLIFF files select the Export to single XLIFF file item from File menu and select directry that will contain the exported files.
Return to: Top of page XLIFF Editor Process
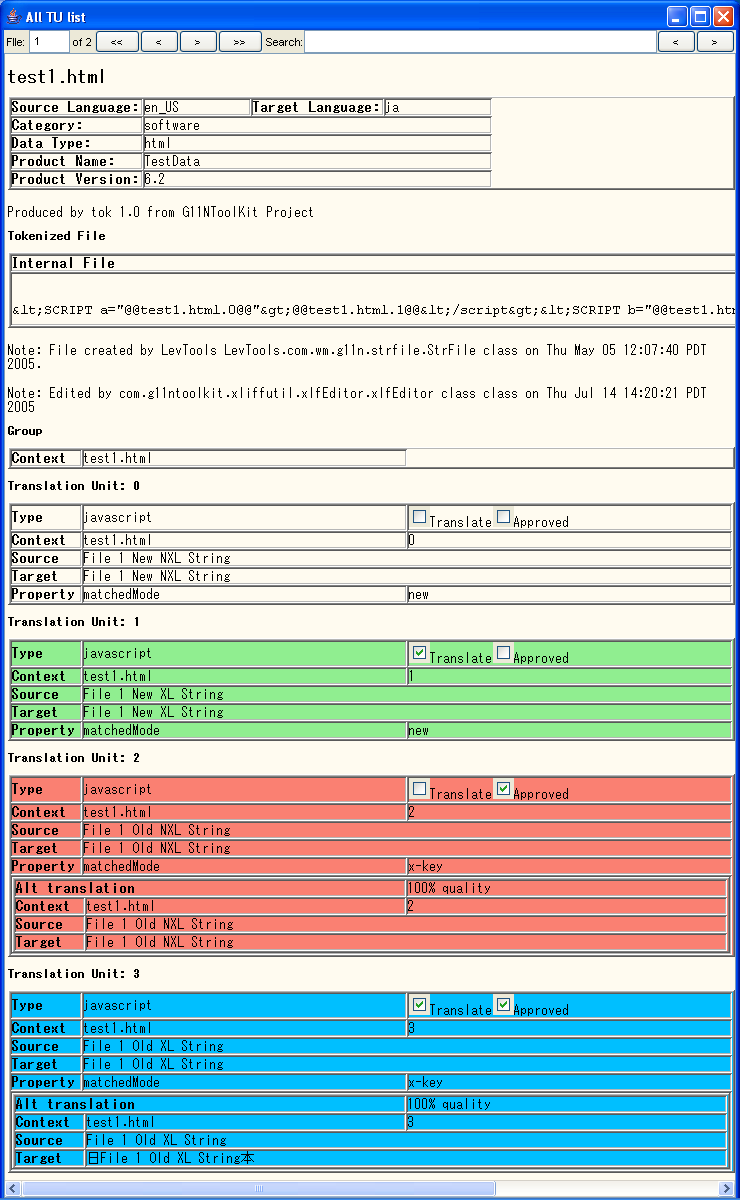
All TUs List Window
To open the All TUs List Window, select the All TUs from item from the View menu.
Return to: Top of page
Buttons for Moving the Pages
- <<
- Move to the top of the original files.
- <
- Move to the previous original file.
- >
- Move to the next original file.
- >>
- Move to the bottom of the original files.
Return to: Top of page
Buttons for Search
- <
- Search up (search for the string toward the first line in the file).
- >
- Search down (search for the string toward the last line in the file).
Return to: Top of page
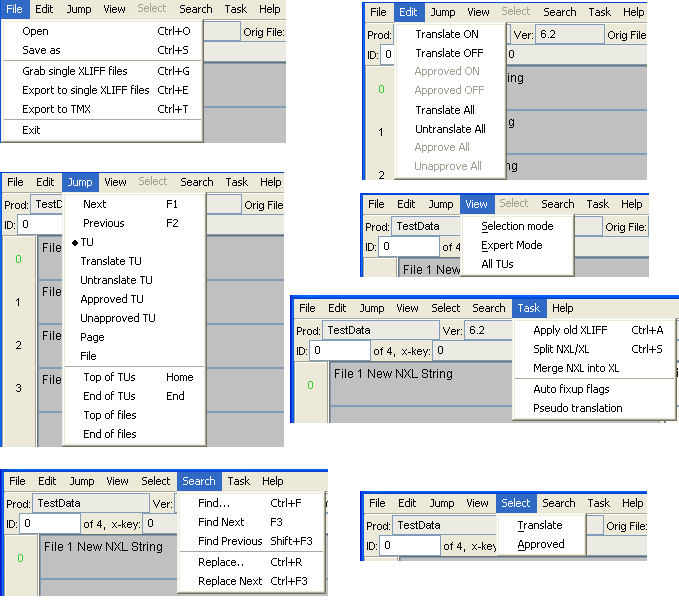
Menus for the XLIFF Editor Dialog Windows
This shows the various menus that can be used in the XLIFF Editor dialog windows.
Return to: Top of page
Current Limitations
- On the current version, only Seach Up, Search down and Close buttons are imprementd. Other buttons and options do not work!
Return to: Top of page
by Masahiko Mori, Bill Rich