Localization Process Guide for G11NToolKit
Localization Process Guide for G11NToolKit
The G11NToolKit classes are designed to extract strings from the source file(s) and replace them with the same or different strings. We assume that somewhere between these two steps you will want to do something useful with the strings such as get them translated or at least pseudo-translate them. Using the toolkit classes in isolated scenarios may be useful but it is not the way they were designed to be used so we make no guarantees that you will like what you produce with them outside this process. Also bear in mind that these classes are not designed for a one shot use. The greater benefit of using the classes is the second and subsequent times they are used for a product or project in conjunction with a translation memory.
All the intermediate files produced by the tool kit will be encoded as UTF-8. The final output file produced by the detokenizers can be encoded as the user desires. The locale parameter for most programs controls the language specification for the contents of the file. The locale parameter does not control the encoding for any of the intermediate files. If you need more information about specifying locales, refer to the Locale Guide.
Return to: Top of page
The Process
The following diagram shows the general flow of the process through the tools. Following the diagram is a brief description of the steps and the various data objects that are used and produced during the process. The numbers and letters in parentheses in the diagram are used as reference points in the text that follows the diagram.

The activities, input, and output for each step of the process are described in the following sections.
- Prepare the localization project
- Prepare the translation request package (TRP)
- Prepare the localized files
- Build the localized product
- Fix bugs in the localized product
- Track changes in the product that affect the localized product
- Repeat the process
Return to: Top of page
Prepare the localization project
-
Discover which files in the product need to be localized. The makelrblist target in the Ant files is provided to help find the Java ListResourceBundle files. Java ListResourceBundle files have a standard format that can be found programatically if the files are well formed. The makelrblist target will find well formed ListResourceBundle files and put the file names in a list file. This list file can be used to prepare part of the Project Control file.
Other file types can be found by their file extension. If this is not possible for a particular file type then the contents of the file must be inspected to determine if the file qualifies as that particular file type.
No general tool is provided to make the Project Control file because the output file name patterns cannot be determined. The output file name patterns are a matter of user choice and must match what is expected by the build tools for the product being localized.
- Discover any deviations from standard file formats or special processing required for the files to make them ready for localization.
- Plan the process and identify any new tools needed to support it.
- Test the process to make sure it will support the requirements of the product being localized.
- Identify any reference material that will be provided to the translator (translation memories, glossaries, style guides,...).
- Plan the delivery objects that are needed to support the build process for the product in its localized state.
- Prepare a manifest of the files to be localized.
The inputs for this step are:
- Product Source Files
- The (A)Source File can be any file format that can be processed by the tokenizers. The tokenizers are designed and implemented to handle specific file types. (A)Source File must be one of these types.
- Reference Materials
- can include any file that may be useful to the translator to aid in translation of the strings for the product. This may include TMs, glossaries, style guides, ...
- Product Changes
- Fix Reports
The outputs for this step are:
- Project Manifest
- includes project control information for the project. This information is especially useful to the project manager and will show the size and effort required for the project. The manifest should include a list of all the source files being localized and the statistics to indicate how big the project is including the word counts for words leveraged from the TM, words that are not to be translated, and words left to translate.
- Project Control File
- similar to the Project Manifest but in more detail with respect to the file list. This file is used in the tool kit and the process to control when and what to do for each source file in the project. Information as to the name of the source file, what type of file it is, whether to translate it or not, and how to form the target file path and name must be included in the Project Control File. A more complete description of the Project Control File is located here.
Return to: Top of page The Process
Prepare the translation request package (TRP)
-
Using the project control file and the tokenizer tool extract the translatable strings from the source files and make them ready for translation.
The source file offered to the tokenizer tool can be from most any locale and can contain both single byte and double byte characters. It can also have been processed by the native2ascii utility program and contain escaped Unicode characters. The tokenizers handle the following file types:
- a Properties Resource Bundle
- a List Resource Bundle
- a JSP file
- a CSS file
- an HTML file
- an XML file
- an XSL file
- an RC file
- an MC file
The tokenizers produce the .STR file that contains the extracted strings that need translation. The .STR file is in XLIFF format and also contains the skeleton of the source file with tokens marking the positions of the extracted strings. These tokens are used by the detokenizers to replace the strings and produce the target files.
Leverage is applying previously approved translations to the current set of extracted strings. The previously approved translations may be contained in a Translation Memory (TM) file that was created during a previous translation of the project. Using it should help to reduce the amount of translation needed in this iteration of the project. The TM is one of the Reference Materials that are identified for the project.
- Package the TRP.
- Deliver the TRP to the translator.
The inputs for this step are:
- Project Control File
- Product Source Files
- Reference Materials
The outputs for this step are:
- Translation Request Package (TRP)
-
The TRP contains all the files (generally the extracted string files) that need to be translated plus the reference materials needed by the translator. If a commercial tool is being used to manage the TM or aid in translation then any files required by that tool should be included in the TRP.
A TRP is what is sent to the translator for translation. A TRP is used instead of the source files so that the translator is not hampered by all the stuff that is of no concern for translation. All of the markup and comments in a TRP are intended to guide the translator to make the right decisions for the translation with a minimum of time spent passing questions and answers back and forth. Generally a TRP will get better at this guidance over time. Every question a translator must ask should be reflected in the comments in the TRP for the next time it is used.
There are three levels of comments that can be useful in the TRP. First is a comment that pertains to the entry in general. Second is a comment that pertains to the source string. Third is a comment that pertains to the target string. In general, if the comment is for a specific language then it is put in the target string comments area. These comments will only be shown in a future TRP that is leveraged from the current TRP.
A marked up TRP that has not been leveraged or translated should be language independent. This means that the comments and the markup should be useful for all target languages not for one specific language. This is sometimes hard to achieve when the first use of the TRP for a project is for a specific language but it is a good thing to keep in mind when marking up the TRP if more languages are planned in the future. Even if no other languages are currently planned it is still good to keep in mind that other languages exist and that comments need to applicable to them as well. In the long run this helps the translators do their job which is to translate the terms rather than just copy and paste from the comments because the exact translation has already been provided.
A tokenizer extracts the strings from each source file and leaves a unique token in place of each extracted string. The token is what enables the detokenizer to put the string back into the file. It is important that the tokens assigned by the tokenizer to the strings are not changed in any way throughout the process. If the tokens or their association with the strings changes, the detokenizer may not be able to put the strings back where they belong.
Return to: Top of page The Process
Prepare the localized files
- Receive the translated TRP from the translator.
- Check the files to make sure they are complete and don't have any syntactic errors.
- Place all the translated strings in the target files.
- Adjust encoding to suit the file types and the build process for the product.
- Place the target files in the directory structure required by the product build process.
The inputs for this step are:
- Translated TRP
- the TRP with the translations completed or corrected for all the extracted string files in the package.
The outputs for this step are:
- Localized Files
- the target files for the project. Generally a copy of the source files with the translatable strings replaced by their translations. The localized files must have the proper names and be placed in the proper path as the build process requires.
- Updated Reference Materials
- reference materials that include any needed updates for the project. The reference materials must be maintained as a part of the project since they will be needed for subsequent projects.
Return to: Top of page The Process
Build the localized product
- Run the product build process.
- Do a smoke test to make sure the product will install and start.
- Ensure that there are at least some localized strings appearing in the UI.
The inputs for this step are:
- Localized Files
The outputs for this step are:
- Localized Product
- the product ready for the selected locale. This should be an installable and runable product that should functionally mirror the source locale product.
Return to: Top of page The Process
Fix bugs in the localized product
- As bugs are reported during quality assurance, analyze the bugs to see if they are localization or internationalization bugs.
- Assign internationalization bugs to the developers to fix.
- Assign translation bugs to the translator to fix.
- Fix the rest of the localization bugs with changes either to the tools or the process.
The inputs for this step are:
- Localized Product
The outputs for this step are:
- Fix Reports
- include any notices of fixes made to a previous TRP caused by L10N bugs in the translation. These fixes should be considered as input for modifications to the tool kit or the process so they do not happen again.
Return to: Top of page The Process
Track changes in the product that affect the localized product
- Monitor any further development on the product to see when changes are made in the UI files.
- Respond to these changes with appropriate changes in the project manifest, the tools, or the process.
The inputs for this step are:
- Localized Product
- Fix Reports
- Product Source Files
- Project Manifest
The outputs for this step are:
- Product Changes
- include any changes made to the product from the last time the product was localized. This is especially useful when the localization process is used iteratively during development of the product.
Return to: Top of page The Process
Repeat Process
Repeat the steps from Prepare TRP through Track Changes as often as needed until the localized product is shipped.
Return to: Top of page The Process
Directory Structure
Projects are usually organized along the lines of products with multiple versions of projects for each product. Generally the project versions are used as the main directory when running the G11NToolKit tools. The product user interface source files are usually stored in extensive directory structures. This allows for files with same name to be in a product. It is imperative that the file names be kept intact for the translated files. To do this we use a product directory structure in the project version work area that mirrors the product directory structure found in the product source code control system.
The directory structure for a project generally starts with the project version directory. These are usually identified by the date the version was started.
Below the project version directory comes the product work area directory structure with as many directories as are needed for the translation project. This may not include all the leaf directories in the product but will include all the branch directories down to any leaf that is needed in the translation project. There are generally two areas of the product work area, one for the source files and one for the target files. In most cases the target files will be placed in the NLS directory structure.
Along with the product workarea is the workarea for a translation tool. This is an area where we can isolate files that will be input to or output from any translation tools. This is a convience area that is needed to protect the rest of the files from abuse by the translation tools. All files in this area should be useable in the translation tool. The xliff2XL.xslt tool is provided as a means to achieve this. If the translation tool can properly process an XLIFF file then the xliff2XL.xslt is not needed.
In a slightly more graphic form the general structure is:
/Project
 /Version
  /Product
   /sourcedirs
   /NLS
    /targetlanguage
     /targetdirs
  /ProjectWorkDir
   /ProductWorkDir
    /sourcedirs
   /XLWorkDir
    /XLProductDir
     /sourcedirs
    /XLOutputDir
     /Product
      /sourcedirs
The reason the sourcedirs are used in the work areas is that this maintains the proper directory structure until the process is ready to create the target directories and files.
Following is an example of a directory structure for an L10N project, MyProd, for the MyProd product. This particular version of the project was created on June 8, 2005 (we use the date form yymmdd so that the versions will be sorted in the proper order when viewing them in a browser or list). The product contains three packages (pkg1, pkg2, and pkg3) that each may contain many directories and files that need translation. We anticipate that only the files that need translation will be copied into the project structure so as to keep the clutter to a minimum.
/MyProd
 /050608
  /MyProd
   /pkg1
   /pkg2
   /pkg3
   /NLS
    /ja
     /pkg1
     /pkg2
     /pkg3
  /WorkDir
   /MyProd
    /pkg1
    /pkg2
    /pkg3
   /XLWorkDir
    /MyProd
     /pkg1
     /pkg2
     /pkg3
    /XLOutputDir
     /MyProd
      /pkg1
      /pkg2
      /pkg3
Return to: Top of page
How the Directory Structure Is Used
How the directory structure is used depends on the type of file being processed.
-
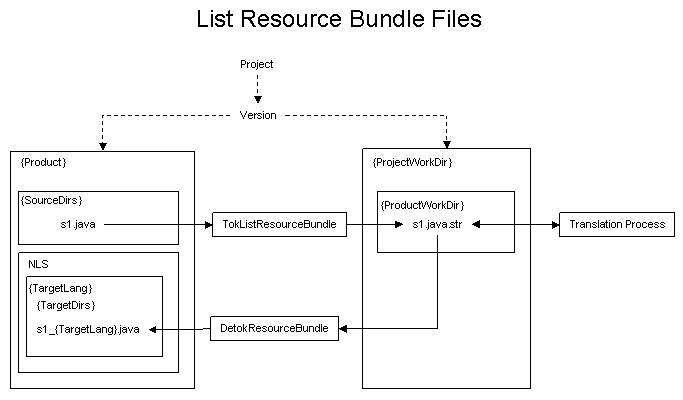
How the directories are used and what tools are used for List Resource Bundle file types (LRB) are shown in the following graphic:

-
How the directories are used and what tools are used for Properties Resource Bundle, Message Catalog, Resource Catalog, and SQL file types(PRB, MC, RC, SQL) are shown in the following graphic:

-
How the directories are used and what tools are used for XML file types (XML) are shown in the following graphic:

-
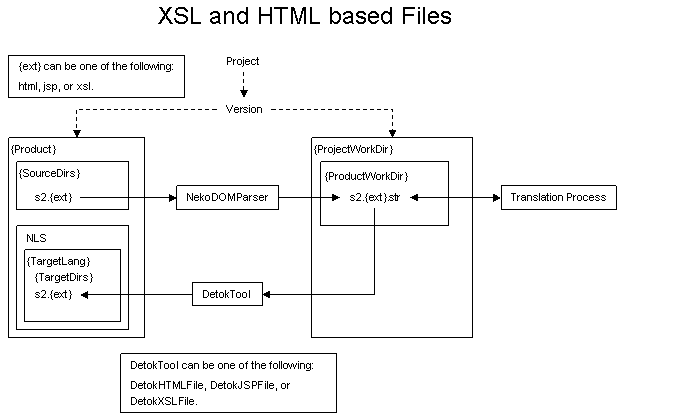
How the directories are used and what tools are used for XSL and HTML based file types (XSL, HTML, JSP) are shown in the following graphic:

-
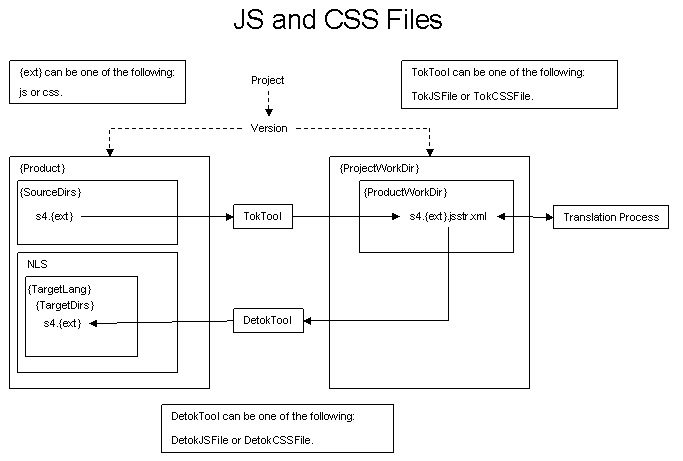
How the directories are used and what tools are used for JS and CSS file types (JS, CSS) are shown in the following graphic:

The Ant product is used for process control. How to use the process is explained in the Process Used From Ant File section. In general the source files and directories are kept as they are when copied to the project area. When the source file is transformed in any way, the resulting transformed file is put in one of the work areas. At any time in the process one should be able to find the files for any given step in the work area.
Return to: Top of page
by Bill Rich


